We always need to strive for constant and quick feedback about the quality of the software we build. One effective way to achieve this, is by enabling a continuous integration server to run our tests every time we create a pull request.

The cypress documentation page provides a good tutorial on how to configure the Github Integration, but it does not provide a good one to properly configure the Github Action CI. So here I’ll show you how easy is to do it by using Cypress to run end-to-end tests and the new kid on the block: Github Actions, as Continuous Integration (CI) server.
In case you don’t know these tools: Cypress is a framework that enables us to write and run end-to-end tests. It provides us APIs to manipulate DOM elements, click buttons, navigate into URLs, and perfectly emulates all sorts of end-user behaviors. It has great documentation and community as well, so if you’re planning to implement e2e tests into your application I recommend you to take a look. You will learn a bit about Cypress on this post as well. Github Actions is the workflow automation tool fully integrated with Github. It works exactly like a continuous integration server such as Jenkins, CircleCI, or TravisCI. Having its limitations though, the main advantages are the built-in integration with Github repositories, its simplicity of pipeline setup, and the workflow definition syntax.
Let’s check the steps we need to follow to accomplish this.
Overall solution
1. Configure Github Actions workflow
The first thing we need is to create a .yml file that describes which steps our CI server must follow: install dependencies, and run the end-to-end specs.
2. Configure Cypress Integration
Having the Github Actions Done, we need to configure the Cypress integration to our GitHub repository. We’ll do that by following some steps through the Cypress Dashboard UI.
Note: The Cypress Integration by itself does not trigger the tests when the pull request is opened, it only allows Cypress dashboard to output test results in some Github repository. If you read the official cypress GitHub integration documentation it might seem that it alone will do the job, but we need a CI server to trigger the integration when a push is done into a specific branch or a new pull request is opened.
Configure Github Actions
To enable the Github Action that will trigger our tests in every push, we need to create a .yml file at the root of the git repository, under the folder: .github/worflows. We’ll name this file “integration-tests.yml”.
Let’s check the content of the .github/worflows/integration-tests.yml file:
This workflow can be found at the GitHub marketplace: https://github.com/marketplace/actions/cypress-io. The file basically describe that for every push event, we want to perform 2 steps: check out the test code and run the cypress tests with some parameters (record, start, and working directory).
-
The record parameter tells that cypress should record videos and take screenshots of each of our tests run. This content will be available after every test run at the cypress dashboard.
-
The start is the command responsible for starting up our application, so cypress can navigate into URLs such as
localhost:8080and find some webpage. Remember: cypress is only a testing tool, it does not serve the application that will be under test. -
In a monorepo, the end-to-end test might be placed in a different sub-folder from the application itself. In this case we must use this working-directory parameter. My repository, for instance, has the following folder structure:
repo/
  api/
  frontend/
  e2e/
    cypress
    cypress.json
  package.json
So to make sure cypress will run the start command in the correct place, we need to define the correct path at the working-directory.
Having it done, as soon as we perform a push in our repository, we’ll see that there is a new tab under the repository called “actions”:

And now every time a new push is made, the configured steps will run at our integration-tests workflow.
At this point, we still don’t have the comment at our pull requests with the test results. Let’s configure the cypress GitHub integration to achieve this.
Configure Cypress Github Integration
Before starting to configure the Github integration, you need the setup our cypress project to record The cypress docs have a great tutorial on how to do that. Follow the steps and after that, get back here to continue:https://docs.cypress.io/guides/dashboard/projects.html#Set-up-a-project-to-record.
Install the Cypress Github App
Having the project configured, now we’ll install the Cypress Github App:
1. Go to the Dashboard Organizations page.
2. Select the organization you wish to integrate with a GitHub account or GitHub organization.

3. Visit the selected organization’s Integrations page via the side navigation
4. Click the Install the Cypress GitHub App button.
5. You will be redirected to github.com to complete the installation. Select the desired Github organization or account to integrate with your cypress dashboard organization.

6. Choose the repository you want to associate with the Cypress GitHub App installation.

7. Click the Install button to complete the installation.
Activating Cypress Github Integration
After completing the Cypress GitHub App installation for your organization you can now enable GitHub Integration for any Cypress project.
1. Go to the project’s settings page.

2. Scroll down to the GitHub Integration section.

3. Select a GitHub repository to associate with the project.

Once a GitHub repository is associated with a Cypress project, the GitHub integration will be immediately enabled:

You can also see all GitHub Integration enabled Cypress projects within your organizations Integrations page:

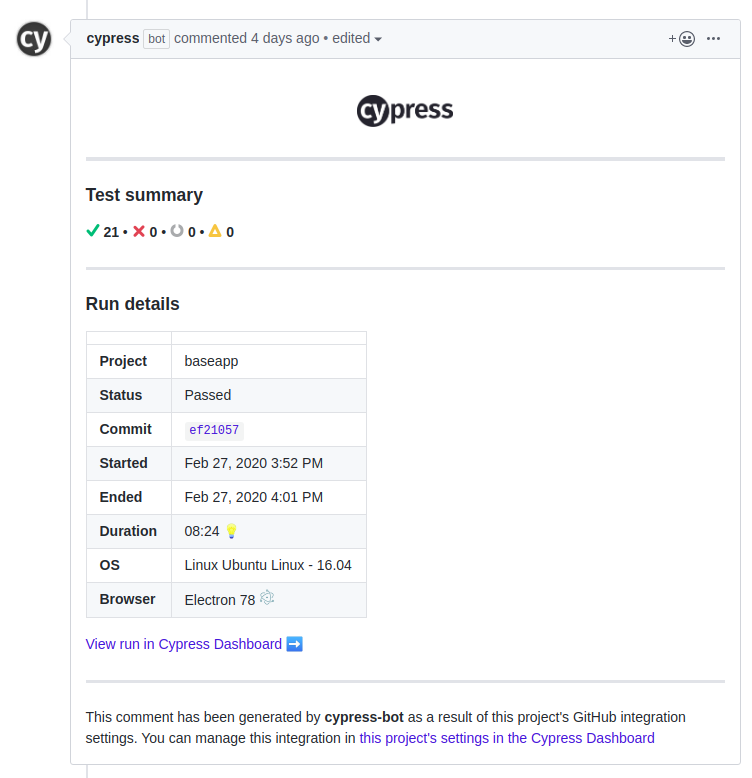
And that’s it! Now whenever you create a PR you should see at the status check tab, the detailed results of the tests, and a comment from the cypress bot at the comments section of your pull request.
If you liked this article, consider sharing it.